The Mische Technique
Scroll down to see all the steps
|
The first step is to prepare a gesso panel. This can be of wood, canvas, or pressed
wood masonite. The surface is sandpapered (in the case of wood or masonite) and
covered with several layers of gesso, sandpapering each layer with very fine sandpaper.
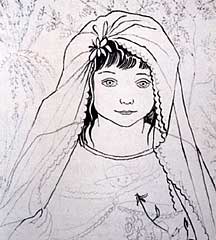
Next a drawing is prepared, either on a sheet of paper of corresponding size, which
is then traced onto the panel, or directly onto the panel itself.
|
|
The drawing is inked in with waterproof ink — Indian Ink is suitable —
using a very fine brush.
|
|
When this is thoroughly dry, the 'ground' or imprimatura is painted on. The ground
should be a warm color — bright red, such as Cadmium red, is most common,
or a rust red, such as Venetian red.
There are various methods of putting on the ground, but the simplest is to paint
it on with oil paints, using as painting medium half linseed oil and half damar
varnish. When this is thoroughly dry, proceed to the next step.
|
The Egg Tempera:
The egg tempera is made in the following manner:
First, the egg medium must be made. Into a clean jar, crack a fresh egg. Add an
equal amount of painting medium (half linseed oil, half damar varnish) then add
water to the amount of both of these combined. Store in the refrigerator. It will
keep for a year. Always shake well before using.
Next, the egg tempera must be ground. To do this you need a frosted glass muller
and a frosted glass plate. You must buy some Titanium White powder (this is obtainable
in most large specialist art stores). Pour a heaped teaspoonful of powder on to
the frosted glass plate, and add enough egg medium until the mixture is the consistency
of yogurt. Next, grind the mixture with the glass muller until all the 'crumbs'
have been smoothed out. The mixture should be smooth and even.
Now, with a palette knife, scrape the mixture onto a small and shallow piece of
sponge or foam rubber, which should be previously prepared, cut to fit in the bottom
of a small, airtight jar, and wet and wrung out so that it is damp, but not soggy.
Wash your glass muller and plate immediately, or they will be ruined. The egg tempera
is now ready to use. When not in use, it should be kept in the refrigerator, and
will last for a week.
|
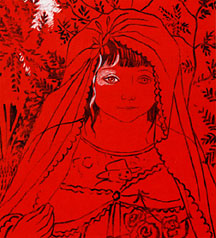
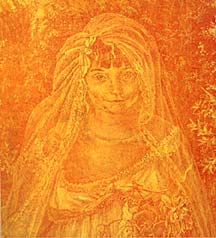
To the left you see the first stage of the egg tempera. It must be noted that the
egg tempera, to be successful, must not be used as an outline, or a mere blocking
in. The tempera must be used to sculpt the subject, using the red of the board as
the darkest dark, and the full strength of the white as the highest highlight. The
end product should look a little like a photograph taken of the subject, but reproduced
in red and white.
When the first coat of egg tempera is thoroughly dry, lightly scrape a razor over
the surface to take out any roughness.
|
A yellow glaze is put over the whole picture.
A glaze is a transparent or semi-transparent layer of oil paint put over the painting
in the same manner as a wash of colour in a watercolor. Just as the wash gets its
lightness from the light reflecting back from the white paper, so the light reflects
back from the egg tempera. The glaze is like a veil rather than a transparent piece
of cellophane. The veil effect is achieved by adding a very small amount of white
to the yellow colour.
Putting on the glaze calls for great care. The most important thing is that the
egg tempera should be fully dry before the glaze is put on. The drying time can
vary depending on the dampness in the air, and the coldness of temperature. It usually
takes at least 2 days.
|
When you are sure the tempera is dry, take yellow paint — This can be Cadmium
Yellow or Lemon Yellow, depending on the effect you need. Add a small amount of
white — just enough to give the effect of a chiffon veil when spread thinly
over the surface. Do not add too much white paint, or the colour will lose its effect
and the whole picture will look 'pasty'.
Add the painting medium, but only a few drops at a time. Just use enough to make
the mixture spread easily. Most people use too much at first. The glaze should be
well mixed together before it is applied by hand using the fatty cushion on the
side of the palm in a series of thumps, aimed at laying on the paint as smoothly
and evenly as possible.
|
If you are successful, the picture should look very exciting at this stage. The
reds will have become orange, and the whites yellow. It enables the artist to take
a fresh look at the work, and I often find additional inspiration at this stage.
The glaze must now be left to dry for at least 2 days. For those artists who, like
me, are of an impatient nature, I advise having several pictures on the go at different
stages. Otherwise, one is tempted to work on a painting before it is dry.
|
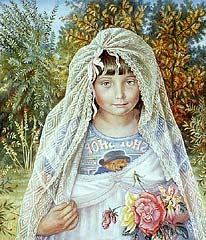
A second coat of egg tempera is now applied. If one is careful, one can add this
when the glaze is tacky rather than bone dry. This layer of egg tempera must not
be seen as a mere repetition of the earlier layer. The whole point of the technique
is that it gives the artist a chance to perfect his or her work.
So this layer should be a refining and redefining process, not a slavish repetition.
One can find a greater subtlety in the tones and add greater expression. One of
the beauties of this technique is the contrast between the crispness of the tempera
and the oily smoothness of the glazes.
When this layer is bone dry, it should be scraped very lightly with a razor again.
It is now ready for the next stage — the blue glaze.
|
|
Again, the artist can choose any blue. Cerulean gives a deliciously sweet effect
— skies that look like spring mornings. Ultramarine is more cold, and can
have the effect of moonlight. Cobalt is somewhere between the two. Do not forget
to add a small amount of white. Blues usually need slightly more white that yellows.
It will take several goes to really understand colour effects, and some people may
like to experiment with the colours first. A colour chart showing the effect of
different glazes on each other would be a very valuable tool and would save a lot
of heartache, too.
|
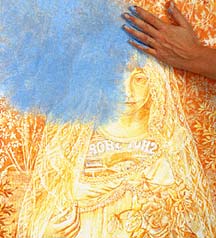
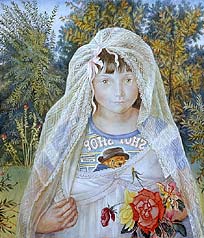
If you are too impatient to make a chart, do try a little of your blue glaze on
a corner on a corner of your painting before you bung it over the whole thing. Too
dark a blue will look dirty and too light a blue looks washed out. If you have made
your glaze too thick, you can thin it by using your hand as a blotter and then wiping
your hand clean; keep wiping and blotting until it looks thin enough so that your
underpainting shows through.
To the left you see the blue glaze going on using the side of the hand.
|
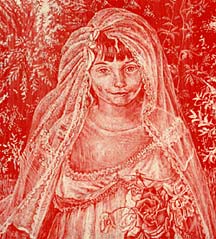
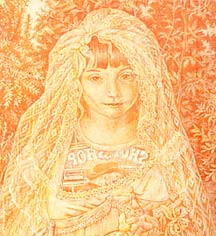
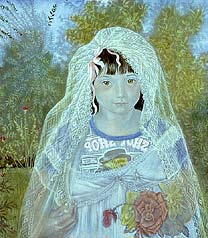
After the blue glaze is dry, you must put on the final overall coat of egg tempera,
remembering what has been said earlier about using the tempera as a refining process.
The picture should be an inspiration to work on now, because the blue is a magical
filter through which the colors shimmer in a mist. The egg tempera now going on
should be as close to perfection as you can make it.
To the left you see the completed egg tempera over the blue. This shows the famous
'optical greys' spoken of by the Masters of the Renaissance. Three primary colours
have been used in turn - red, yellow, and blue separated by layers of 'light' in
the form of white egg tempera. This creates a mysterious chemical effect in which
one can see all kinds of colour combinations shimmering through the layers, like
the colours of an opal.
|
|
This can be very helpful to the artist in picturing the colours wanted for the final
stage. Mostly, the shadows do not need much overpainting. They have appeared by
being left out, by 'unpainting', and have a quality not obtainable by direct painting.
Making sure your egg tempera is dry, scrape it lightly with a razor, and then decide
what colour everything is going to be. Now you put the colour on, adding a little
white as you did for the glazes. It is better to use a brush for this, as a hand
would be too big to get the details. It's a good idea to keep a second, dry brush
on hand to lift off any excess glaze. In this way, you can also work on different
sections of the painting at the same time. This is always an agony for the artist.
You have to sacrifice the beauty of the blue glaze in order to get the colours.
With luck and hard work, you will get it all back in the end, and more.
|
|
While this stage of applying the dark colours comes very close to ordinary oil painting,
great care must be taken not to paint too thickly or cover up too much. If the painting
gets too covered over, a light blotting with the side of the hand will remove excess
paint and keep the translucent look. Remember to check that the hand is clean.
Details should be put on with a very fine brush.
|
|
When the layer of local colours is dry, it is important to go back to the egg tempera
again to pull out the details that need heightening and strengthening. It can also
restore any details that may have been obscured by overpainting.
|
|
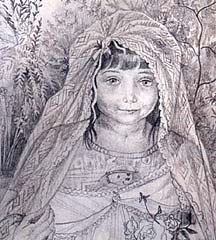
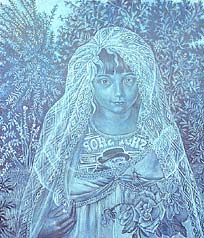
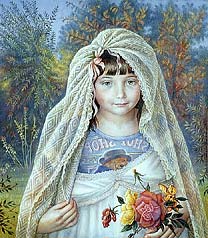
The final painting is shown at left. If it is compared to the previous stage, one
can see the use of final glazes to establish the right emphasis. The background
and the t-shirt have been knocked back by blue glazes. The roses, face, and ribbon
have been brought forward. A creamy pink glaze has pulled the face together, and
on top of this the features have been carefully brought out. The underpainting shows
through on the face and creates shadows that would have been much harsher if they
had been overpainted instead.
One warning: never leave any white egg tempera exposed. If you wish to leave the
egg tempera unglazed by a color, then cover it with a clear glaze of painting medium.
A year after the painting has been completed, it should be given a final coat of
varnish.
|